cook, Uncategorized

Blue Apron

My husband and I have been toying with the idea of trying Blue Apron for some time now. The thought of trying out new menu options that A) can help us get the kids interested in cooking with us and B) are delivered straight to our front porch sounded amazing. We received a promo code that gave us $30 off and decided to finally give it a try. We opted for the twice weekly meal for four, which costs $69.92 per week ($8.74 per serving).

One thing I really liked when I first signed up was that I was able to choose certain options we did not want sent (lamb, shellfish, meat, etc). Even better is that once I signed up I could choose between their weekly menu options (at least this is the case with the twice weekly plan), meaning that each week I can go in and choose two out of the four menu options they offer. Another plus is that if we ever choose to not have Blue Apron deliver (if we are out of town, have guests, etc) we can simply skip the week and are not charged nothing at all.

For us, the cost was easy to digest- heck, it’s usually $40 for us to order pizza anymore!- at about $35 per meal for four. What we were anxious about is whether the food would be as easy to digest as the price tag.

I was super excited to open our first box from Blue Apron when it arrived, and it did not disappoint! Everything was packed super nice and orderly, with big enough icepacks to keep everything (meat included) cold. There were printed recipes and instructions for the two meals of the week, as well as a informational brochure on avocado (an absolute favorite at our house!) and a cooking lesson for kids (limited time only on the kids lesson- but perfect timing since part of us signing up was to involve the kids). Everything looked fresh and I liked that literally everything (besides salt, pepper and EVOO) was included. No trips to the store necessary!

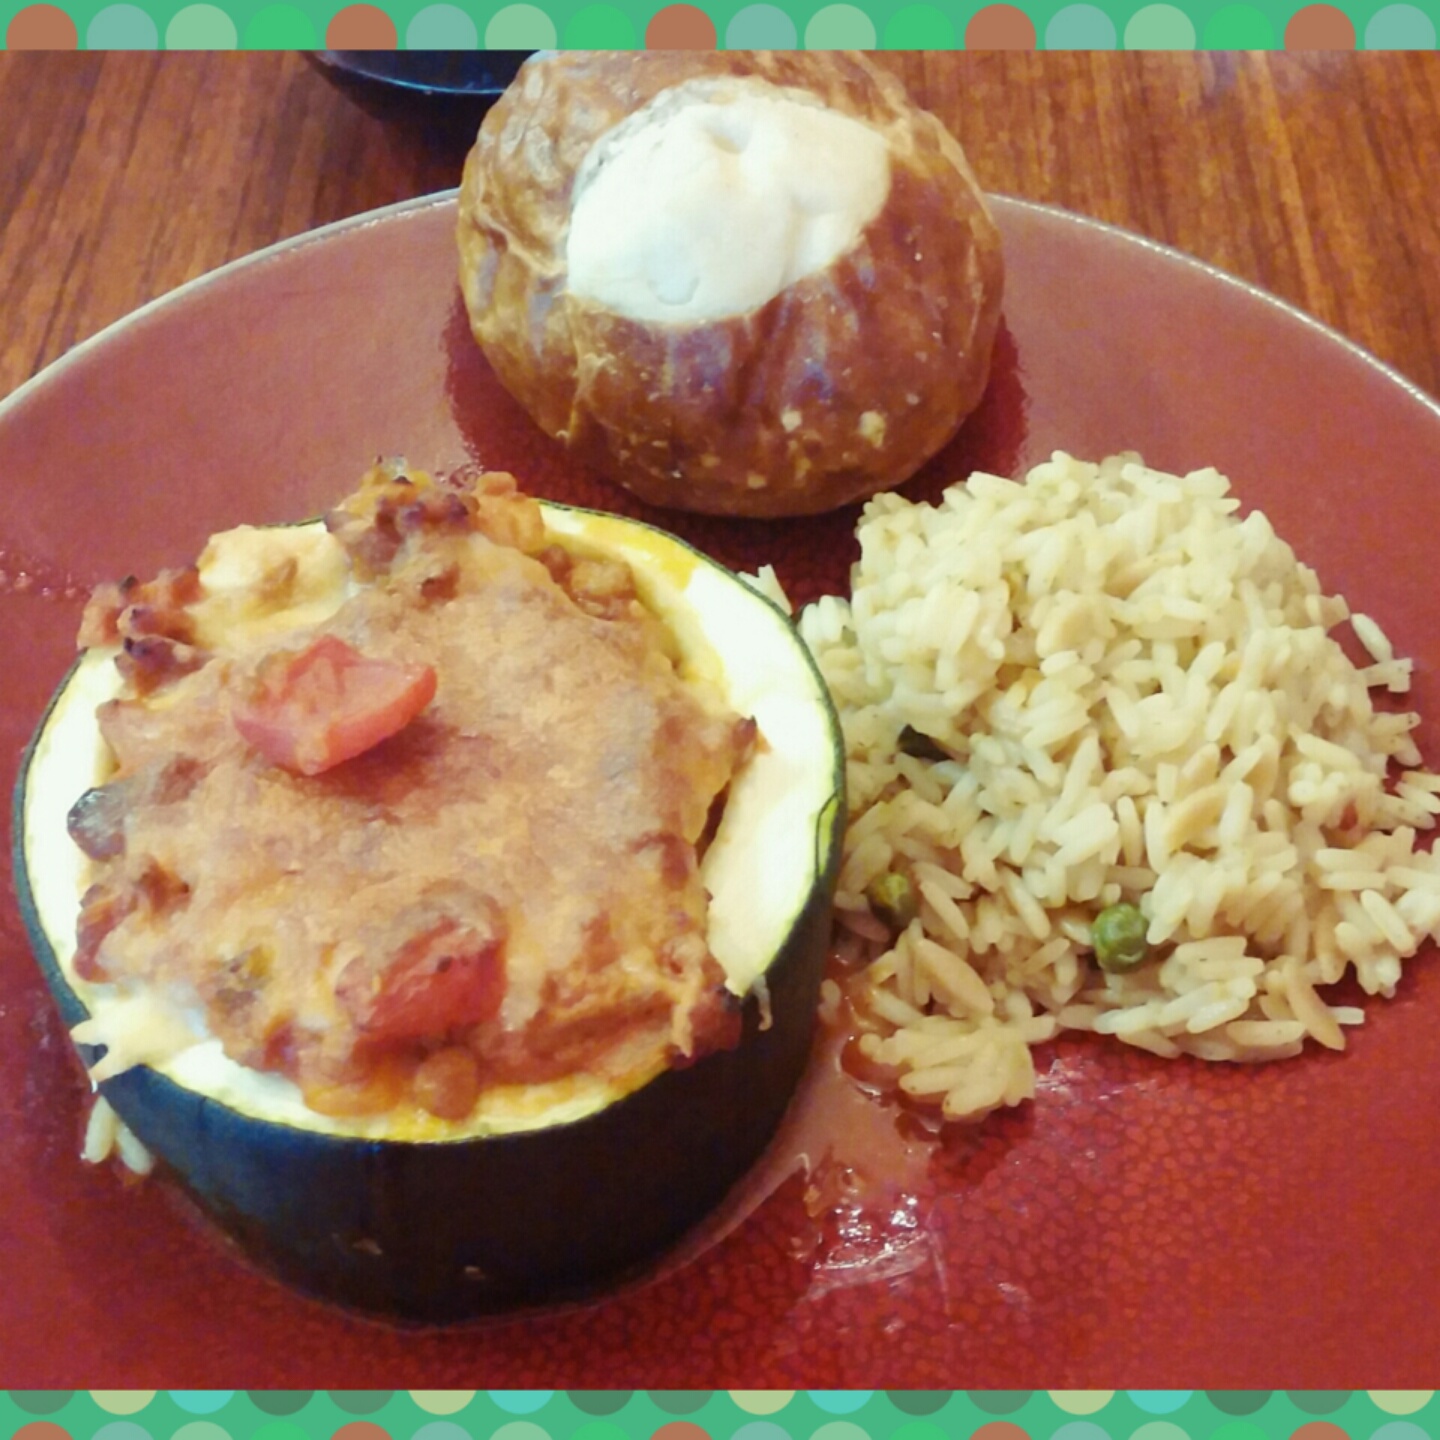
Our first week included Spiced Steaks & Tomato-Avocado Salad and Zucchini & Mozzarella Pizza Paninis.

As hoped, the kiddos both chipped in and helped cook our first Blue Apron meals. I found that the recipe was super easy to follow (even for the kids), and both prep and cook time were pretty quick. (I would say that I average about 1 hour in the kitchen, between prep and cook times for most Blue Apron recipes)

The end result?? Both adults and kids LOVED both of the first week’s recipes! Hurray!!

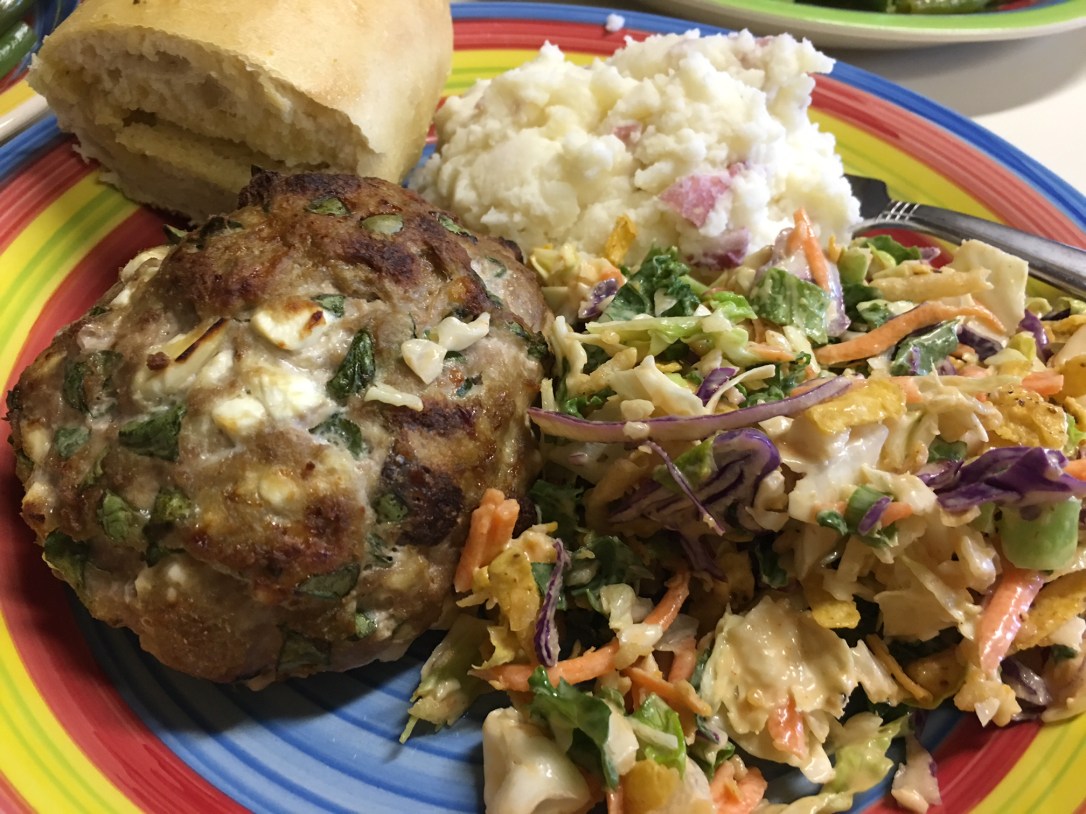
We have continued with Blue Apron since we first tried it and, I can honestly say, most of the recipes are awesome (and they are usually between 600-800 calories per serving). There have really only been two or three that we would’t make again. What has been really great is that Blue Apron offers ingredients that I wouldn’t normally cook with. We always make the kids try everything, so it has been really neat to see them expanding their experiences with food.

Do they always help cook the meals? No, not really. But I do have them sit with me and help choose which meals they think sound the most interesting. This still ensures that they stay involved, and helps in the case their is something they end up not liking so much.

Blue Apron is a definite win in our house!
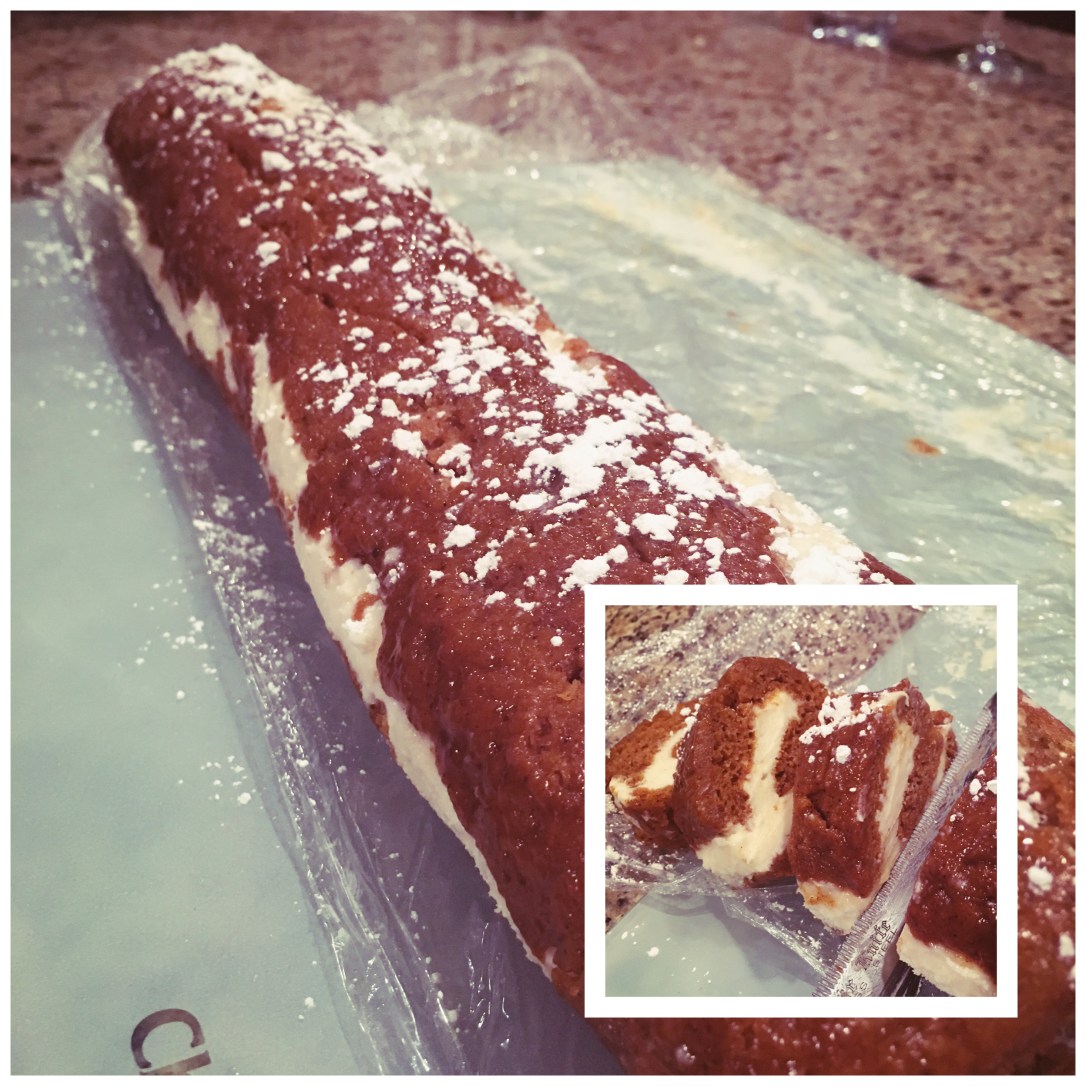
cook, Uncategorized

Mediterranean Turkey Burgers

I did a recipe exchange with some girlfriends about 8 years ago and ended up with this gem  that adds flare to any average burger night. It is simple enough to make in bulk, so we use this one a lot when having friends or family over for dinner or a bbq. Because of that, it is by far my most requested recipe. The best part about these burgers is that they are different, yet the ingredients are are palatable to almost everyone (sorry to those of you who don’t like spinach and/or feta).

  • 1 lb ground turkey
  • 1 large egg
  • 1 slice of whole wheat bread- cubed
  • 2 cup spinach- chopped
  • 1 cup crumbled feta cheese
  • 1 Tbsp minced onion
  • 1/2 tsp garlic powder
  • 1/2 tsp salt

Preheat oven to 350˚

Combine mixture in large bowl, ensuring feta is crumbled into smaller pieces and ingredients are distributed evenly throughout meat. Form into patties, or a loaf (which we do often). Place on broil pan (for patties) or flat baking sheet (for loaf). Cook for 30-35 minutes, or until internal temperature is 165˚

Note: You can bbq the burger patties as well, just ensure that the internal temperature is 165˚ before serving.

We serve these burgers (with or without buns!) with just about anything- a nice salad, rice, mashed potatoes, corn on the cob (for bbq), etc. It is as versatile as it is delicious! Enjoy!!

IMG_2210

Mediterranean Turkey Burgers (no buns): Serves 4- 290 calories, 15.7g fat, 3.9g carbs, 28.9g protein

cook, Uncategorized

Tuna Salad Done Healthy

Tuna salad sandwiches are a favorite at our house- kids love it, it is a great source of protein, delicious, and easy to prepare! I have found though, that not all tuna salad is made equal (have you ever looked at the mayo you might be using?). Have you ever thought of subbing the mayo out??

Check out the comparison of the cottage cheese (1/2 cup = 90 calories, 2.5g fat, 13g protein) I use to make my tuna salad vs Olive Oil Mayo (1 Tbsp = 60 calories, 6g fat, 0g protein).

This is where my healthier, lighter, more protein (without the extra fat) and vegetable packed version comes in- and no, the kids can’t tell the difference or seem to mind that I’m sneaking veggies in (major win!).

Recipe:

  • 1 can solid white albacore in water
  • 1/2 cup low fat (2% milk fat) cottage cheese
  • 3-4 mini carrots (shredded- I use a mini grater)
  • 1-2 mini kosher dill pickles (shredded- again, the mini grater)
  • 4 white corn tortillas
  • 1/2 cup shredded mozzarella
  • Salt & Pepper to taste

This particular recipe is with corn tortillas, rather than bread. I brown the tortillas on the stovetop, add tuna mixture and 1/8 cup mozzarella, and fold like a quesadilla. Easy to eat- and delish!!

Tuna Salad Done Healthy:   Serves 2- 254 calories, 8.6g fat, 14.7g carbs, 30.1g protein

Compared to Old Fashioned Tuna Salad (with whole wheat bread, swiss cheese, and mayo): Serves 2- 389 calories, 16.9g fat, 27.4g carbs, 35.5g protein

Winner: Tuna Salad Done Healthy!!


cook

Fall Pumpkin Roll

Thanksgiving is one the best days of the year for us- we eat foods we wouldn’t normally take the time to make or enjoy, we spend time with family and friends we don’t always see, we truly take the time to acknowledge all the things we are thankful for, and when it’s all done- we sit down to relax and enjoy some football (tonight is a real treat- Bears at Green Bay!!).

This year I was extra spoiled…my family and I went and spent some time with my mom at her cabin and she cooked- everything. Well, almost everything. I have said it before, and I will say it again- my husband is undoubtedly the better baker of us two. Thanksgiving time is no different. Pumpkin Pie is his speciality, and one of his absolute favorite (non-chocolate) desserts. This year, he decided to try a slightly different take on the traditional, and went with a Pumpkin Roll. The end result?? Amazing!

This Pumpkin Roll is both easy and an absolute must try for your fall season festivities. I hope you enjoy this recipe and I wish you a Happy Thanksgiving from my family to yours!!

IMG_0803Roll:

  • 3/4 c flour
  • 1/2 tsp baking powder
  • 1/2 tsp baking soda
  • 1/2 tsp ground cinnamon
  • 1/2 tsp ground cloves
  • 1/4 tsp salt
  • 3 large eggs (beaten)
  • 1 c granulated sugar
  • 2/3 c pumpkin pie filling (canned)
  • 1/4 tsp (approx.) nutmeg

IMG_0804Filling (All mixed together until soft):

  • 8 oz cream cheese (room temperature)
  • 1 c sifted powdered sugar
  • 6 TBSP softened butter
  • 1 tsp vanilla extract

Instructions:

Preheat oven to 375˚ and grease/flour a baking sheet. Combine flour, baking soda, baking powder, salt, cinnamon and cloves in small bowl. Combine beaten eggs and granulated sugar in larger bowl. Add pumpkin and stir in flour mixture. Spread evenly onto baking sheet. Sprinkle nutmeg evenly over the top of cake. Bake for 12 minutes (or until the cake springs back).

IMG_0805
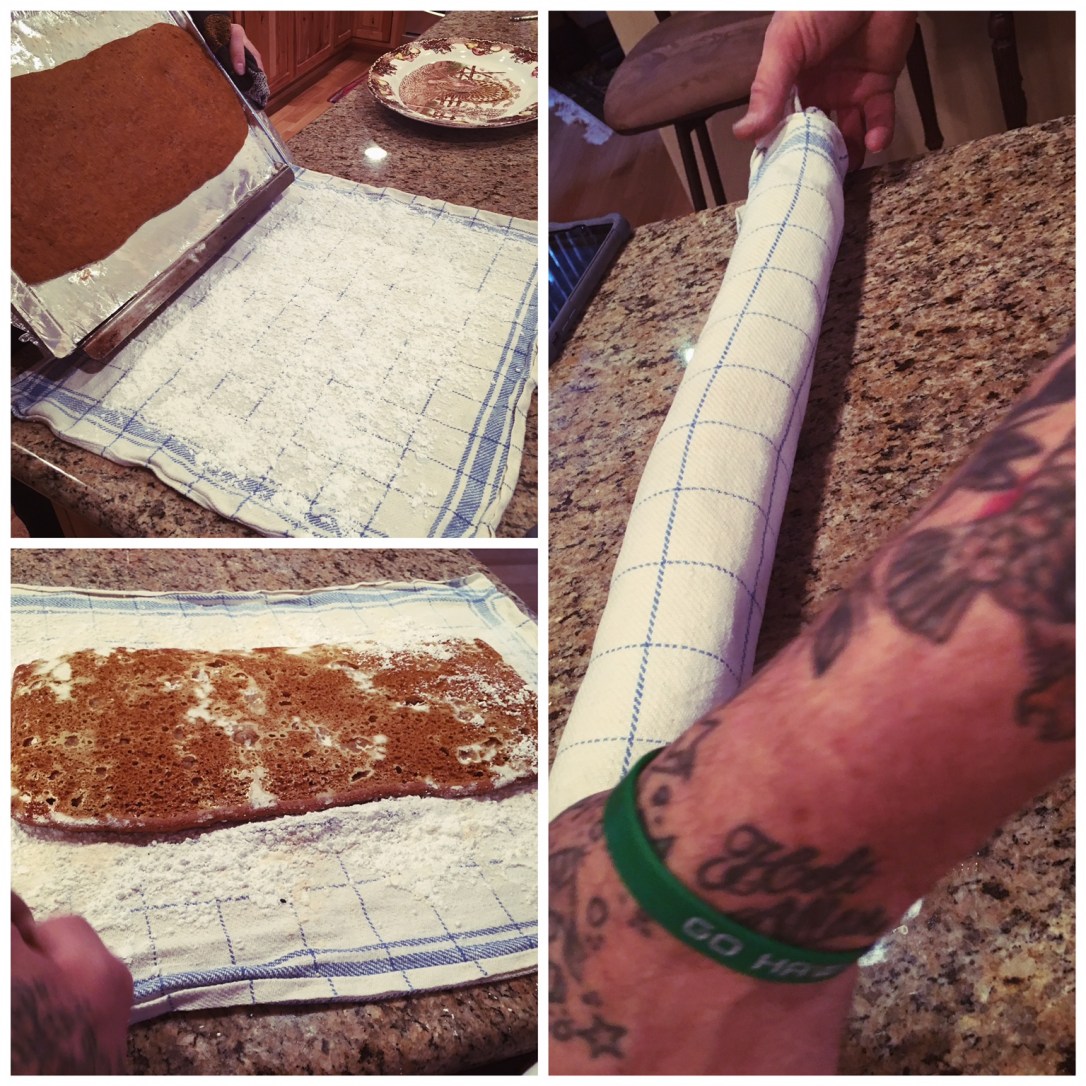
Sprinkle 1/4c powdered sugar onto a clean towel. Turn cake over onto sugared towel and roll vertically (so that the cake is long and narrow). Allow to cool.

IMG_0806
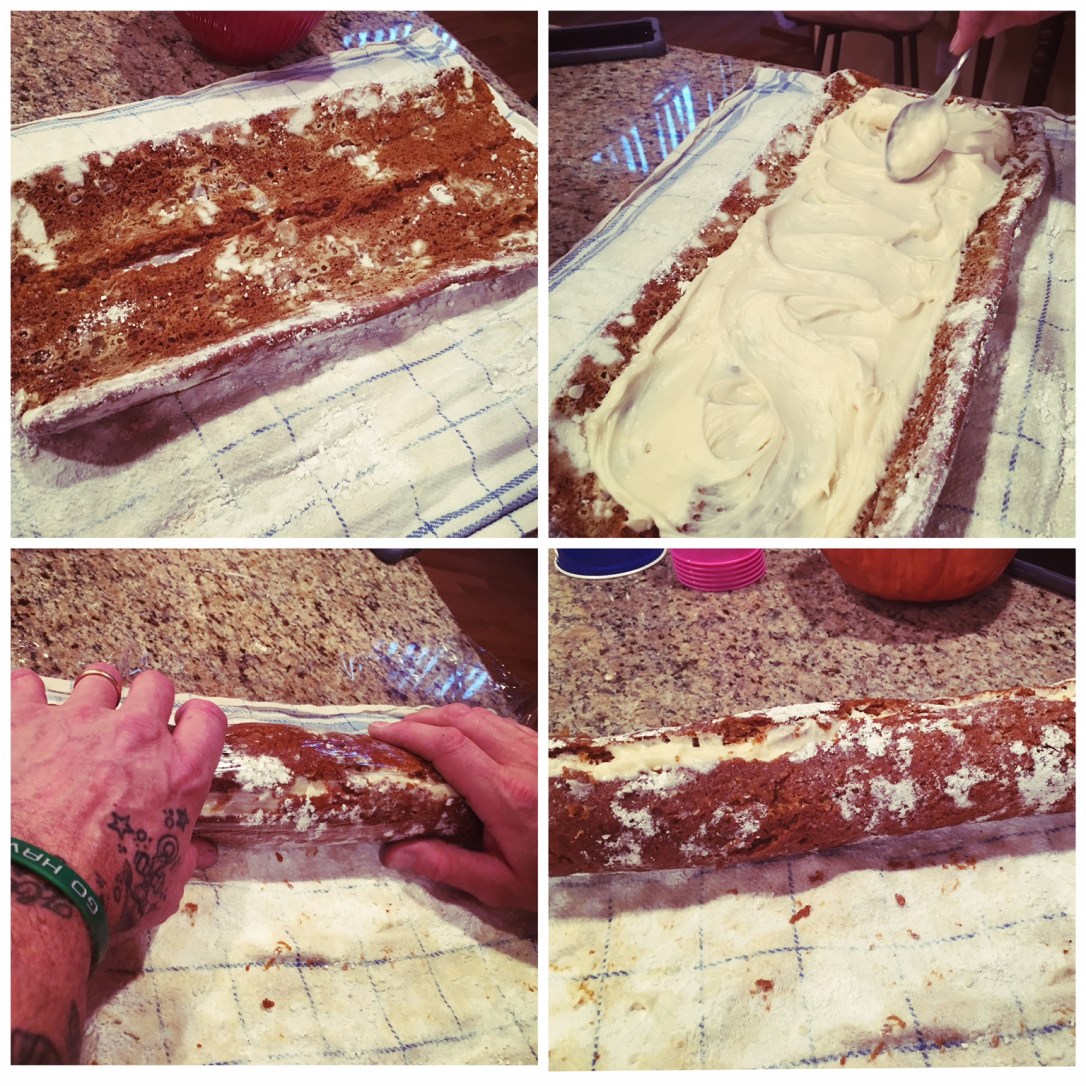
Once cooled, unroll cake and spread filling evenly over cake. Roll the cake back up with filling inside, wrap in plastic wrap, and refrigerate for 1-2 hours. Dust with powdered sugar before serving.

image

Each roll will serve approximately 12, with about 310 calories per serving.

cook

Turkey Quinoa Enchilada Casserole

Before you can even say it, I’ll admit it…another ground turkey recipe…I know, I know…head hung.

BUT…this one is just too delicious (and easy) to pass up. This one is a hit with both the husband and the kids, and has officially replaced the go-to traditional enchilada casserole recipe that we got from a Mexican restaurant I worked for way back in the day (stay tuned for that recipe…it’s ridiculously good!!).

PhotoGrid_1447211373638

1 cup red quinoa (prepared as package states)
1 lb ground turkey (I add one package of taco seasoning)
1/2 c corn (I use white organic from Costco)
1/2 c black beans
1 avocado (chopped)
2 TBSP chopped cilantro
1 can mild enchilada sauce
1 can green chilies
1/2 tsp cumin
1/2 tsp chili powder
3/4 c shredded mozzarella
3/4 c shredded cheddar
Mix all ingredients other than turkey and quinoa in small bowl.
PhotoGrid_1447211515053
Layer in casserole dish: quinoa, turkey, mixed ingredients, cheese.
Bake at 375˚ for 30 minutes.
PhotoGrid_1447211321512
Makes 4 servings. This is about 471 calories for 1 serving.
Enjoy!
cook

Italian Citrus Turkey Casserole

Last night my husband and I were able to celebrate another successful healthy, kid-friendly, recipe! Kids ate (almost) everything on their plate, and didn’t even bat an eye at the garbanzo beans, which are usually a definite no-go. This is a super easy recipe that anyone can do and it came in at only about 375 calories per serving (before the rice).

Ingredients:

PhotoGrid_1442938324575

  • 1 lb ground turkey (I apologize that the protein in this one is ground turkey again…we eat it a lot…I promise to get some different meats up here for you soon)
  • 1 can organic garbanzo beans
  • 4 bell peppers of your choice- chopped (I used 2 green, 1 red, and 1 orange)
  • 4 stalks of celery- chopped
  • 1 medium white onion- chopped
  • 2 cloves garlic- minced
  • 1/4c lemon juice
  • 1/4c Italian dressing
  • 2Tbsp EVOO (A note for those of you who are used to soupy/saucy casseroles…this is NOT one! This dish is about 99% substance and only 1% liquid, so expect only a small amount of citrusy fluid on the bottom of the casserole dish once cooked)
  • 1 1/2c shredded mozzarella cheese

Directions:

PhotoGrid_1442938365900

  • Cook ground turkey on stovetop over medium heat until brown
  • While turkey is cooking, chop peppers, celery, and onions and combine with minced onion, garbanzo beans (drained), lemon juice, EVOO, and Italian dressing in a large bowl. Mix well, making sure all ingredients are coated with dressing/oil/juice mix
  • Add turkey to vegetables and, again, mix well
  • Transfer to a casserole dish and top with shredded mozzarella
  • Bake at 350˚ for 30 minutes

PhotoGrid_1442938529279

This whole dish took only about 20 minutes to prepare, which I was able to do before soccer practice (hurray! for all you multi-tasking mommas). We served ours over rice, which was absolutely delicious.

A big bonus for this recipe was the many colors of the dish…colorful dishes are always a win in our house! If you haven’t experienced eating with color, check this article out before you go…Colorful Eating Has Health Benefits

I hope you all enjoy!! Until next time…

cook, grow

Homegrown Watermelon

Who doesn’t love a little watermelon?

PhotoGrid_1441056718335

This year, when we were picking out plants to put in our garden, my children chose a watermelon plant to add to our berries, herbs, and lavender. We had never planted watermelon before so we weren’t sure what to expect (or how much room was needed). We picked a small area in the corner of our garden and went for it.

Our watermelon plant came in one of those pre-planted “pots” that are biodegradable and require only that you remove the bottom when planting, so it was super easy to plant. A month or so down the road, with some dedicated watering by the kids, the vine started to take off…and by take “off”, I really mean take “over”! The vine literally meandered its way throughout the entire garden, blocking out other plants and moving up walls and fencing. Despite the giant vine though, there were no watermelon in sight.

Last year we had a similar experience with pumpkins…the plant itself grew massive but no pumpkins came before picking season so we pulled it (next time we will find a better location with more room so it can stay!). We thought our watermelon was going to see a similar end…and then it happened! Adorable little melons started popping up everywhere! A little more TLC, and a few more months, and they were looking ripe for the picking.

My husband (let’s be honest, he’s the green thumb of us two) started his research, and found a few things about how to tell if the watermelon was ripe (the thumping doesn’t always give you the right answer…our first “hollow sounding” melon was white on the inside…oops!), how many watermelon each vine should grow (we have about 10 growing now…more than what he read was the “normal”), etc.

PhotoGrid_1441056598392

Here is a basic breakdown of what we found in our first year (DISCLAIMER: We are most definitely NOT watermelon experts…just sharing what we learned from our experience):

  1. Flip the watermelon over and check the color of the bottom. An olive oil color is ideal…if it’s still white or really light, it is a no go!
  2. Tap the watermelon with the palm of your hand. The melon should sound really hollow.
  3. Look at the “spoon” and the “tendril” of the watermelon. The spoon is a small leaf close to the melon, and the tendril will be the one closest to the melon. Both should be completely brown. If they are green, the melon is not yet ripe.PhotoGrid_1441056636444
  4. Make sure you have PLENTY of room when planting watermelon. I would say that our plant is about 10′ long and 8′ wide…and growing.

Our watermelon are delicious AND they are coming at the perfect timing (you know…when fall is just around the corner), allowing us to enjoy summer just a little longer!

If you have any other watermelon tips or secrets I would love to hear them…

cook

Zucchini Bowls

Not sure about your kids and family, but finding healthy things that everyone enjoys can be rough. When given the choice for dinner, one son would choose pizza, another mac n’ cheese and the husband brownies…no joke, I’m sure I could have an entire post on the amount of chocolate he eats…so I’m constantly trying to find new ways to make healthy foods delicious and not obviously healthy (yes, you heard me right, I trick all three of them).

The other day I was lucky enough to have a co-worker bring me the biggest vegetables I’ve ever seen, all fresh and straight from her garden. I grabbed up a zucchini, Arminian cucumber, and some lemon cucumbers (not pictured).

PhotoGrid_1440091695280_resized

Now…what to do with a 2 1/2′ zucchini or cucumber, you ask? Well…I came up with a super easy recipe (half borrowed from Pinterest, half Kristin creation) that both husband and kiddos loved! Shocking, I know! And so Zucchini Bowls have now found a place in our recipe box.

Disclaimer: One thing you will learn from me is that I hardly ever follow a recipe step by step or ingredient by ingredient. When someone asks for one of my recipes it tends to go a little like “a pinch of that…and sometimes a pinch of this…”. For the sanity of the recipe followers out there, I will try my best to give exacts whenever I come up with something delish! I apologize in advance for the times I don’t!

Zucchini Bowls:

  • Cut a zucchini into 2-3″ rounds, making sure that the bottoms are flat, and scoop out inside. (I used a melon ball scooper) Set each bowl on a cookie sheet with parchment paper.
  • Dice one medium white onion and one green bell pepper and sauté over medium heat until soft in 1 TBSP olive oil
  • In another pan, brown one lb ground turkey
  • Add bell pepper and onion to turkey once browned (you can do this all in pan however, we buy ground turkey in bulk and freeze so I separate so it cooks more evenly)

PhotoGrid_1440091529577_resized

  • Add one can tomato sauce, one diced tomato, and about 1 tsp salt/1 tsp pepper
  • Let simmer until tomato sauce is no longer runny
  • Scoop into zucchini bowls and top with mozzarella cheese (about 1/3c per bowl…probably 1/4c per bowl would do for regular sized zucchini)
  • Bake at 375˚ for 30 minutes, or until cheese is lightly brown and zucchini is soft
  • Serve and Enjoy!

PhotoGrid_1440091617033_resized

We served ours with a pretzel roll and rice pilaf.  A big plus to this recipe is that I was able to blanch and freeze the zucchini insides and remains for future zucchini bread and muffins!

And in case you’re wondering what happened with the cucumber…we sliced, lightly salted and served with feta cheese. An easy and delicious snack or side!!