cook

Easy Bake Chicken Pot Pie Casserole

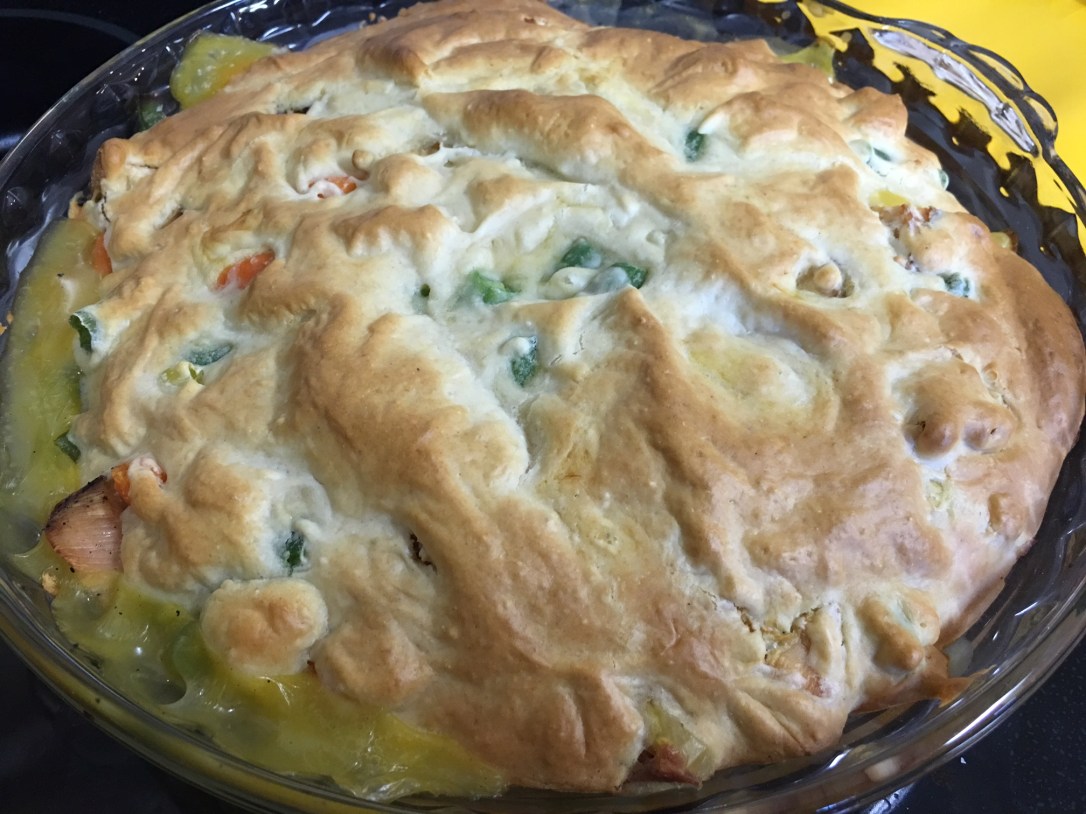
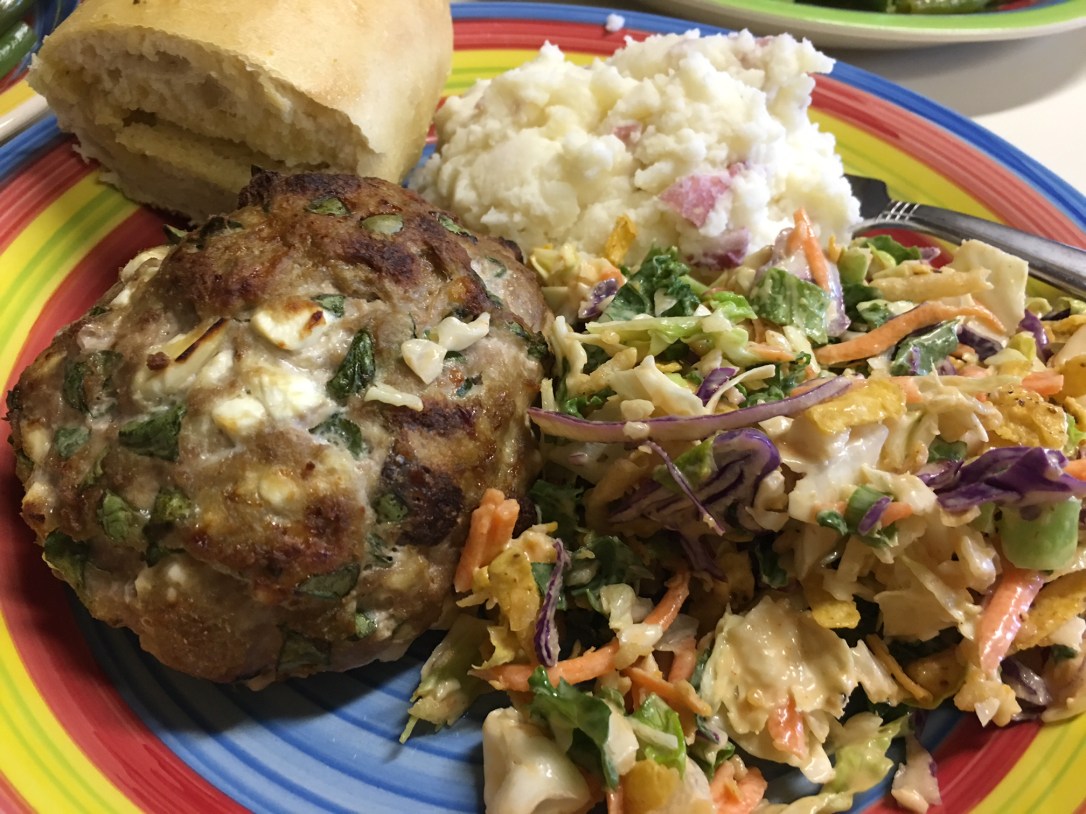
In the never ending quest for family friendly recipes that can be put together on the fly, I ran across this unbelievably easy and delish dish. This home-style chicken bake is a great take on the classic chicken pot pie- a staple comfort food from my own childhood- and can literally be done in 35 minutes, from start to finish (with pre-grilled chicken breasts**).

My husband and kids enjoyed this dish, and the taste was good enough that they didn’t even question the amount of vegetables it included (score!). I’m looking forward to using this recipe often during the fall and winter months, when we are rushed with practices and games and the weather craves warm comfort foods.

Recipe:

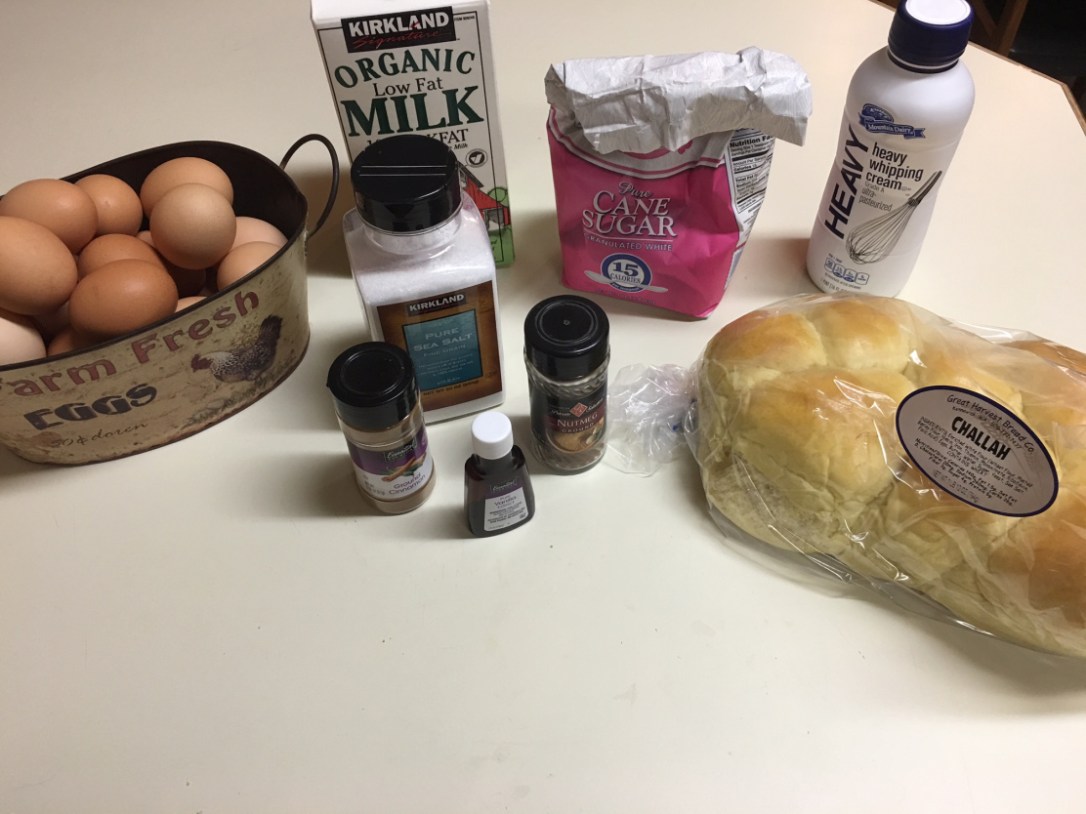
  • 2 grilled chicken breasts, cubed
  • 1 12oz bag frozen mixed vegetables
  • 1 can 98% Fat Free Cream of Chicken soup
  • ½ tsp salt
  • ½ tsp pepper
  • 1 cup Bisquick (or other mix)
  • ½ cup Milk (we use Fat Free)
  • 1 large egg

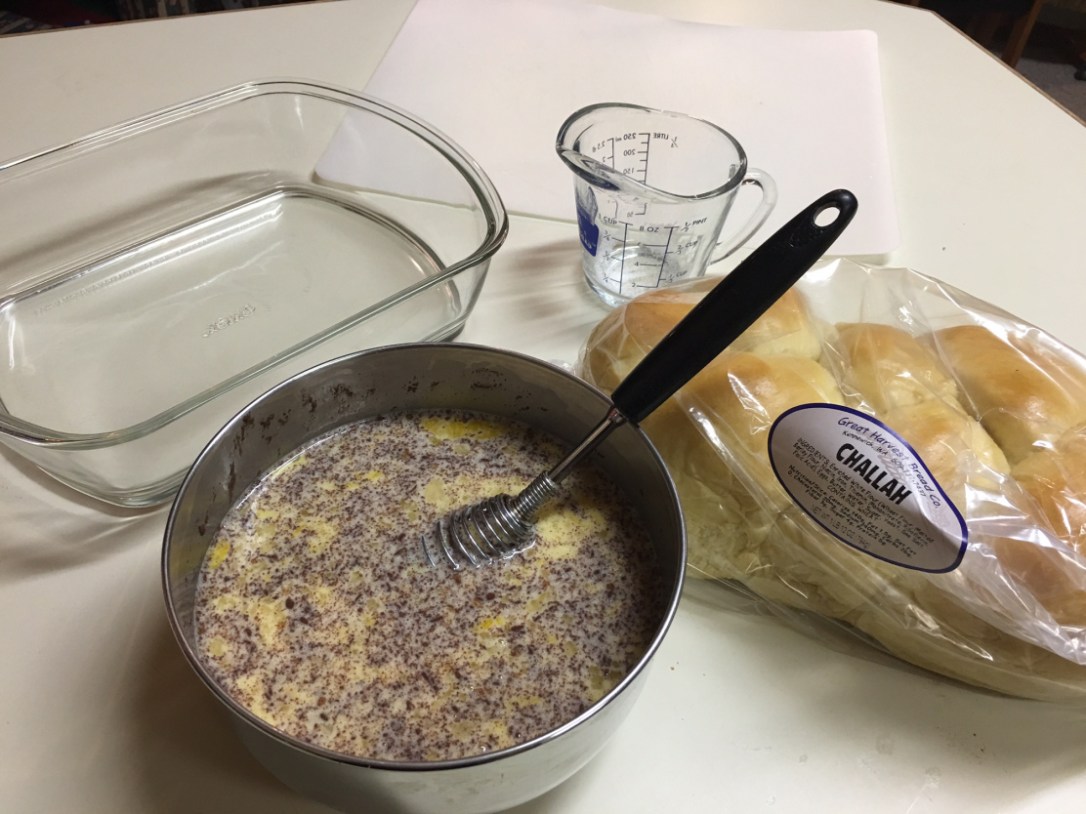
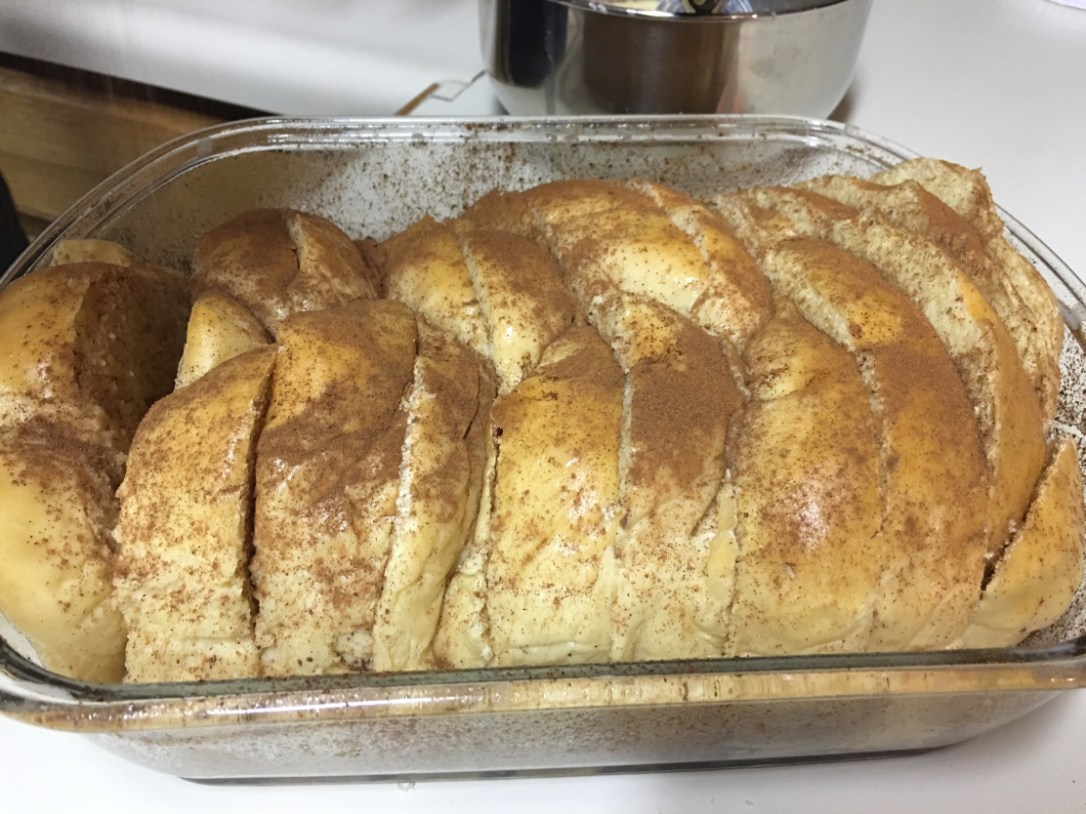
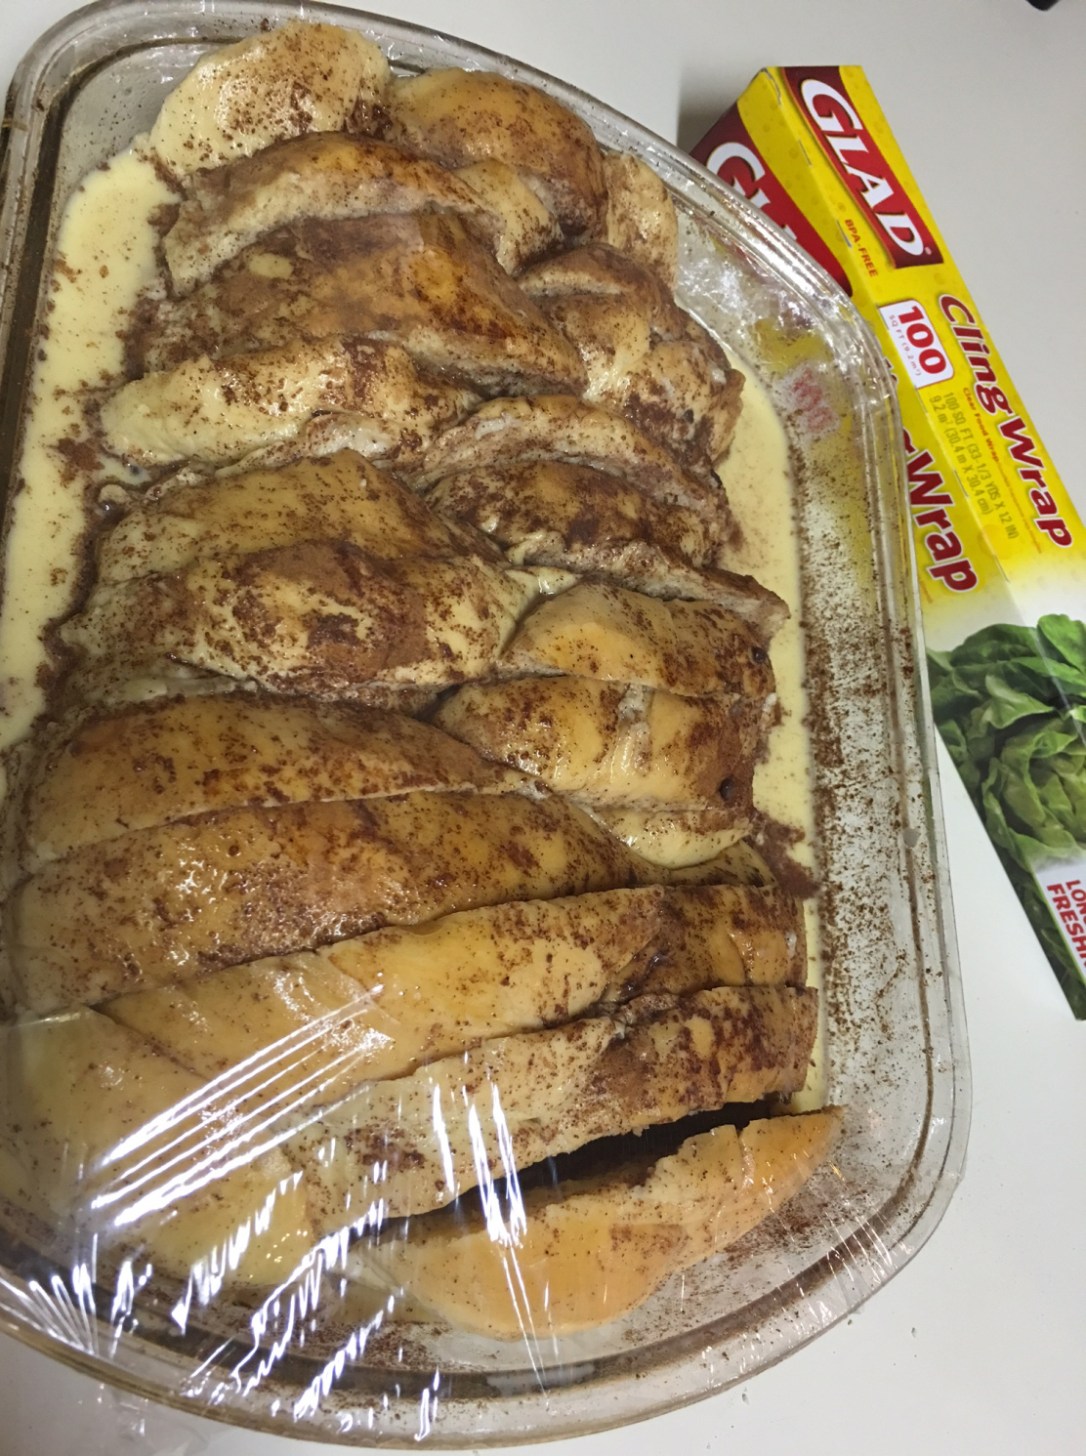
Preheat oven to 400˚. In 9” pie pan, mix chicken, frozen veggies, soup (soup only– do not add milk/water), and salt/pepper so that all ingredients are coated well with the soup. In medium bowl mix Bisquick, milk and egg well. Pour over top of chicken mix in pie pan, using a spatula to spread evenly and to edges. Bake for 30 minutes, or until golden brown on top.

We cut this into 4 even servings, which was about perfect for our family. The nutritional information per serving (for 4 servings) is below. Enjoy!!

IMG_3111

Calories- 340; Total Fat- 12g; Carbohydrate- 33g; Protein- 21g

**When menu planning, we make sure that certain ingredients can be used in multiple meals throughout the week. Chicken (and ground turkey, of course-haha) is always used multiple times in our house during the week so when we prepare grilled chicken, I will prepare extra at the same time and store in the refrigerator for the next recipe.

cook, Uncategorized

Blue Apron

My husband and I have been toying with the idea of trying Blue Apron for some time now. The thought of trying out new menu options that A) can help us get the kids interested in cooking with us and B) are delivered straight to our front porch sounded amazing. We received a promo code that gave us $30 off and decided to finally give it a try. We opted for the twice weekly meal for four, which costs $69.92 per week ($8.74 per serving).

One thing I really liked when I first signed up was that I was able to choose certain options we did not want sent (lamb, shellfish, meat, etc). Even better is that once I signed up I could choose between their weekly menu options (at least this is the case with the twice weekly plan), meaning that each week I can go in and choose two out of the four menu options they offer. Another plus is that if we ever choose to not have Blue Apron deliver (if we are out of town, have guests, etc) we can simply skip the week and are not charged nothing at all.

For us, the cost was easy to digest- heck, it’s usually $40 for us to order pizza anymore!- at about $35 per meal for four. What we were anxious about is whether the food would be as easy to digest as the price tag.

I was super excited to open our first box from Blue Apron when it arrived, and it did not disappoint! Everything was packed super nice and orderly, with big enough icepacks to keep everything (meat included) cold. There were printed recipes and instructions for the two meals of the week, as well as a informational brochure on avocado (an absolute favorite at our house!) and a cooking lesson for kids (limited time only on the kids lesson- but perfect timing since part of us signing up was to involve the kids). Everything looked fresh and I liked that literally everything (besides salt, pepper and EVOO) was included. No trips to the store necessary!

Our first week included Spiced Steaks & Tomato-Avocado Salad and Zucchini & Mozzarella Pizza Paninis.

As hoped, the kiddos both chipped in and helped cook our first Blue Apron meals. I found that the recipe was super easy to follow (even for the kids), and both prep and cook time were pretty quick. (I would say that I average about 1 hour in the kitchen, between prep and cook times for most Blue Apron recipes)

The end result?? Both adults and kids LOVED both of the first week’s recipes! Hurray!!

We have continued with Blue Apron since we first tried it and, I can honestly say, most of the recipes are awesome (and they are usually between 600-800 calories per serving). There have really only been two or three that we would’t make again. What has been really great is that Blue Apron offers ingredients that I wouldn’t normally cook with. We always make the kids try everything, so it has been really neat to see them expanding their experiences with food.

Do they always help cook the meals? No, not really. But I do have them sit with me and help choose which meals they think sound the most interesting. This still ensures that they stay involved, and helps in the case their is something they end up not liking so much.

Blue Apron is a definite win in our house!

cook, Uncategorized

Football Birthday Cake

I am the first to admit that I am not the baker, or cake decorator, of the family. My husband is not only an artist, but he loves to bake and spent a good chunk of his high school years working at Baskin Robbins, as their cake decoration specialist. Those things combined generally equal really cool desserts and cakes. How can I possibly compete with our things like our sons 2nd birthday cakes (below)???

birthday
My husband- the master cake maker…

That being said, when it comes down to preparing ourselves for a houseful of rowdy boys  he usually takes the stuff like preparing the yard and pool, refereeing the sports, and after party clean up, while I take the decorations, menu planning and the cooking (which usually means the birthday cake baking too). This year my son really wanted a football party and, while my Pinterest wall speaks wonders of the ways to decorate football themed cakes, I wasn’t ready to botch an outlandish dessert with something you’d find on “Nailed It”. Instead I tried something simple, and cute…a football shaped cake.

Note: If you are an advanced baker, or can do wonders with fondant and frosting, this post is NOT for you. This tutorial is the simplest football cake you can make- and one that pretty much no one can mess up 🙂 It may not be the most beautiful of all sports cakes, but the boys loved it and I was awed by how truly easy it was.

I started by baking two 9″ round yellow cakes (made with one box of yellow cake mix) per the instructions and allowed them to completely cool.

IMG_2343
One box makes two 9″ rounds.

Once cooled, I stacked the cakes on top of one another, using a thin layer of frosting to adhere. Once stacked, I measured and cut/removed 2″ stripe from the very center of the cake and then placed the two pieces together into prolate spheroid (or football shape). Mine was still a bit “fat” and if I were to make this cake again, I would add another 1/2″ or so to the center being removed.

IMG_2345
Stacked cakes with center removed.

I then frosted the two cakes together with chocolate frosting, ensuring that they were frosted together in one piece. I read a few great blogs and how-to’s that suggested using paper towels to press into the frosting once dry for the football texture. I would have done this, had I not waited till the day of to make the cake…next time!

IMG_2346
A football taking shape.

Last, I used a premed tube of Wilton white decorating icing to make laces and seams. And presto- the simplest football cake you can make! Cute for the kids, yet easy for the (non-baking) parents!! Enjoy!

IMG_2357
Easiest football cake there is!!
cook, Uncategorized

Mediterranean Turkey Burgers

I did a recipe exchange with some girlfriends about 8 years ago and ended up with this gem  that adds flare to any average burger night. It is simple enough to make in bulk, so we use this one a lot when having friends or family over for dinner or a bbq. Because of that, it is by far my most requested recipe. The best part about these burgers is that they are different, yet the ingredients are are palatable to almost everyone (sorry to those of you who don’t like spinach and/or feta).

  • 1 lb ground turkey
  • 1 large egg
  • 1 slice of whole wheat bread- cubed
  • 2 cup spinach- chopped
  • 1 cup crumbled feta cheese
  • 1 Tbsp minced onion
  • 1/2 tsp garlic powder
  • 1/2 tsp salt

Preheat oven to 350˚

Combine mixture in large bowl, ensuring feta is crumbled into smaller pieces and ingredients are distributed evenly throughout meat. Form into patties, or a loaf (which we do often). Place on broil pan (for patties) or flat baking sheet (for loaf). Cook for 30-35 minutes, or until internal temperature is 165˚

Note: You can bbq the burger patties as well, just ensure that the internal temperature is 165˚ before serving.

We serve these burgers (with or without buns!) with just about anything- a nice salad, rice, mashed potatoes, corn on the cob (for bbq), etc. It is as versatile as it is delicious! Enjoy!!

IMG_2210

Mediterranean Turkey Burgers (no buns): Serves 4- 290 calories, 15.7g fat, 3.9g carbs, 28.9g protein

cook, Uncategorized

Tuna Salad Done Healthy

Tuna salad sandwiches are a favorite at our house- kids love it, it is a great source of protein, delicious, and easy to prepare! I have found though, that not all tuna salad is made equal (have you ever looked at the mayo you might be using?). Have you ever thought of subbing the mayo out??

Check out the comparison of the cottage cheese (1/2 cup = 90 calories, 2.5g fat, 13g protein) I use to make my tuna salad vs Olive Oil Mayo (1 Tbsp = 60 calories, 6g fat, 0g protein).

This is where my healthier, lighter, more protein (without the extra fat) and vegetable packed version comes in- and no, the kids can’t tell the difference or seem to mind that I’m sneaking veggies in (major win!).

Recipe:

  • 1 can solid white albacore in water
  • 1/2 cup low fat (2% milk fat) cottage cheese
  • 3-4 mini carrots (shredded- I use a mini grater)
  • 1-2 mini kosher dill pickles (shredded- again, the mini grater)
  • 4 white corn tortillas
  • 1/2 cup shredded mozzarella
  • Salt & Pepper to taste

This particular recipe is with corn tortillas, rather than bread. I brown the tortillas on the stovetop, add tuna mixture and 1/8 cup mozzarella, and fold like a quesadilla. Easy to eat- and delish!!

Tuna Salad Done Healthy:   Serves 2- 254 calories, 8.6g fat, 14.7g carbs, 30.1g protein

Compared to Old Fashioned Tuna Salad (with whole wheat bread, swiss cheese, and mayo): Serves 2- 389 calories, 16.9g fat, 27.4g carbs, 35.5g protein

Winner: Tuna Salad Done Healthy!!


cook, Uncategorized

Saturday Dinner…with Swagger

It is a little known secret that when my husband and I met I couldn’t cook to save my life- I literally ruined french toast on one of our breakfast dates. Lucky for him…and our children, and all future dinner parties…I was eager to learn and spent lots of time reading cookbooks, experimenting in the kitchen, and nabbing every hint and recipe I could from my mom, step-mom and mother-in-law.

My mother-in-law, in particular, is a pro at home cooking, and her amazing, yet usually not super healthy, recipes are my husband’s absolute faves! Over time, I’ve taken to tweaking some of her famous recipes into more healthy versions. Such is the case with Hamburger Pie, which is a staple in our home (in the healthier version at least).

A quick note: The version of Hamburger Pie I’m sharing tonight is the “quick” version (we decided, uncharacteristically, to throw something together tonight), and contains some canned veggies. More often than not, I do fresh green beans and frozen white corn form Costco.

  • 1.5 lbs ground turkey
  • 2 green peppers, chopped
  • 1/2 can tomato paste
  • 1 can diced tomatoes
  • 2 cans french green beans (or sub 2 cups fresh green beans)
  • 1 can corn (or sub 1 cup frozen white corn)
  • 3-4 red potatoes (depending on size), chopped and then mashed
  • 1 cup shredded mozzarella cheese
  • 2 Tbsp shredded parmesan cheese

Preheat oven to 350˚. Brown ground turkey, adding chopped green pepper after almost fully cooked through. Allow pepper to soften. Add 1/2 can tomato paste and 1 can diced tomatoes. Stir until turkey/pepper mix is fully coated in tomatoes and paste.

FullSizeRender[12]FullSizeRender[13]

While turkey is browning, chop red potatoes and bring to a boil. Once soft, drain and mash (I usually add a small amount of fat-free milk (maybe 1/4 cup), a Tbsp butter, and some fresh garlic) into a soft mashed puree. FullSizeRender[11]

In a glass 13×9″ baking dish, layer ingredients: turkey/pepper/tomato mixture, followed by green beans and corn, followed by mashed potato mix, and finally cheeses.

Bake for 35-40 minutes or until bubbly and slightly browned.FullSizeRender[18]FullSizeRender[19]

Enjoy!

cook, Uncategorized

The Perfect Chocolate Chip Cookie

As promised…I am going to share the secret behind my husband’s perfect chocolate chip cookies. It’s nothing crazy…no secret ingredient that we happened upon while vacationing in Whitman, Massachusetts (no, we have never actually been to Whitman…and if you don’t know the significance of Whitman, get to googling the chocolate chip cookie). The hubby’s secret is a rather simple one, but it is a simple one that literally makes the best cookies…you know, the ones that stay soft and fluffy, with just that little bit of crisp on the outside.

Here goes…

  • 11.5 ounces semi-sweet chocolate baking chips
  • 1 cup butter, softened
  • 1 1/2 cup brown sugar, packed
  • 2 large eggs
  • 2 tsp vanilla
  • 2 1/4 cups flour, unsifted
  • 1 tsp baking soda
  • 1/2 tsp salt

Heat oven to 375˚. Stir flour, baking soda and salt in large bowl and set aside. Beat butter and sugar with mixer at medium speed until creamy. Add eggs and vanilla and mix at low until mixed thoroughly. Gradually add dry ingredients.

Drop onto uncreased cookie sheets (we use a small ice cream scoop for the perfect sized drop) and bake for 9 minutes, or until golden brown.

Did you see it? Did you catch the secret? The secret to the perfect chocolate chip cookie- that stays soft- is brown sugar. Brown sugar is more moist (hence the moisture of the cookie) than its white counterpart, and contains molasses, which is slightly acidic and causes the dough to stay firm rather than spread out into a thin, flat cookie. I told you it was a simple secret!

IMG_1580Try it on your next batch…the people who try them will appreciate it- and you 🙂
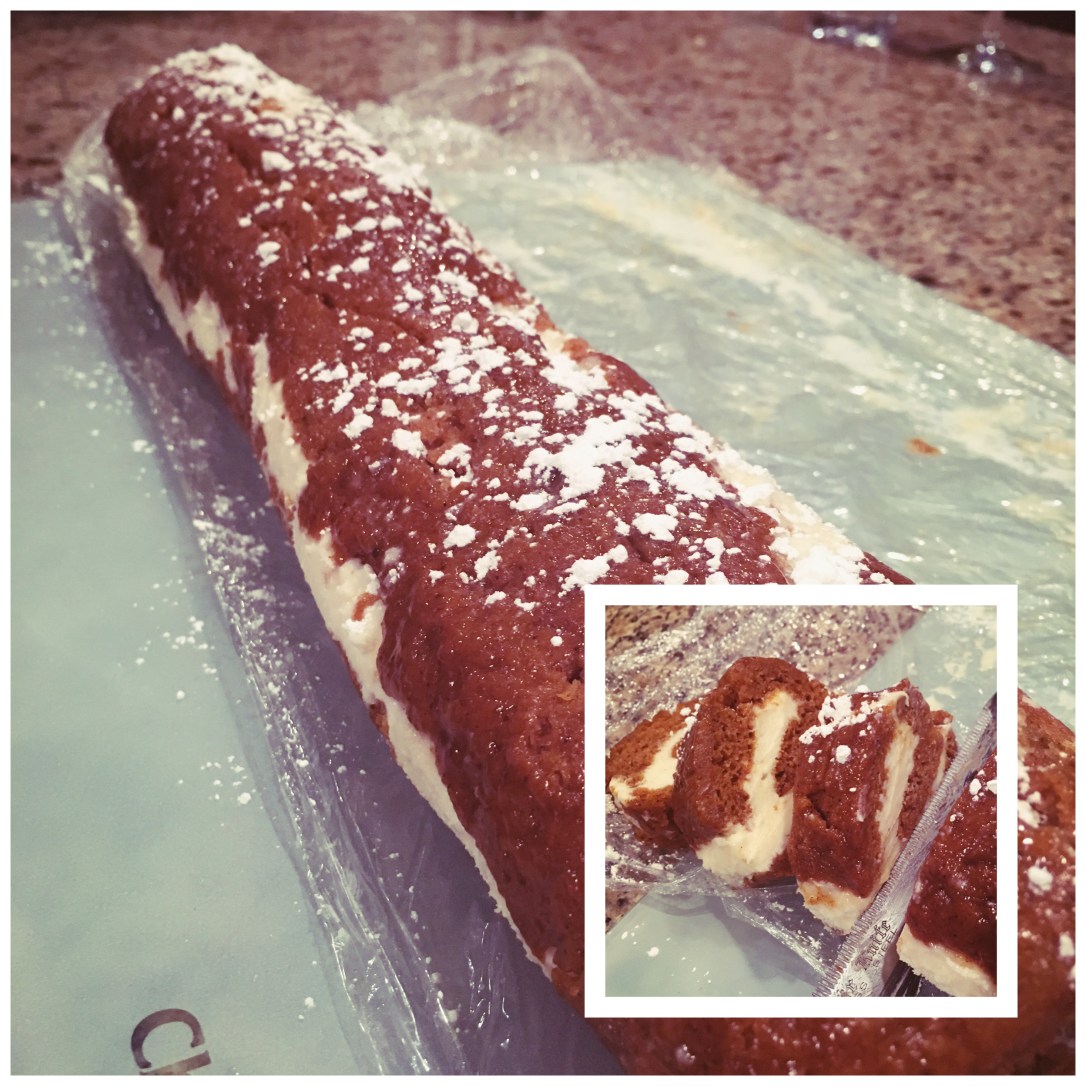
 

clean, cook

My Favorite Pans…

My husband and I have owned and used lots of different cookware in our time. Our pot set, which was handed down from my parents when we got married, is from Amway (Amway Queen Cookware) and, despite being older than I am, it still looks like new, cooks beautifully, and never stains or sticks. I seriously love my pot set! Pans, however, we have not had as much luck with…we have tried Cuisinart, Calphalon, Analon and more and have never found a set that works for us. Some have been ok, yes, but eventually they have all let us down and forced us to go searching for yet another pan set…

In steps Sur La Table and their GreenPan Healthy Ceramic Nonstick Skillets. No joke- these are, by far, the best pans I have ever owned. Nothing sticks to these pans- nothing…eggs? no butter needed…meat? slides right around the pan with no spray…pancakes? no oil necessary…and that is just the beginning. Clean-up is so super easy, with even dried sauce literally sliding off. The nonstick coating of these skillets is also eco-friendly, safe, and non-toxic, and they are dishwasher safe (though I would never put mine in the dishwasher). Sur La Table offers these pans in a few different colors, and the turquoise brought a little pick me up to our kitchen. I would totally recommend these pans to anyone looking for a new set. The price is definitely worth the quality!

img_1250img_1252img_1253

Note: I was not asked to review these pans, nor have I had any contact with, or compensation from, Sur La Table or GreenPan…I just love their pans!!

cook

Overnight French Toast

We are not big breakfast eaters at our house…it is usually Isagenix shakes for mom and dad (more on that to come) and cereal or oatmeal for the kiddos. There are some occasions that just cry out for big celebratory breakfasts though- Christmas and Easter morning, kids first/last sports games, friends/family staying from out of town, the first weekend of summer vacation, etc. While enjoying a big breakfast is sometimes great, spending all morning in the kitchen is definitely not my idea of fun (especially for the not-so-morning-person such as myself)!

In steps the Overnight French Toast to save the day- all the yum, none of the early morning prep! Not only is this breakfast delicious, it also feeds a lot of people. Perfect for the holidays! My husband and I prepped this on Christmas Eve…after the kiddos were in bed and just before Santa came to visit our house. On Christmas morning, all we had to do was pop it in the oven and enjoy the kids devouring their new goods. We served our Overnight Toast with turkey bacon, which was a perfect combo of sweet and savory.

img_1007

  • 6 large eggs
  • 2 cups milk
  • 1/3 cup heavy cream
  • 1/3 cup plus 2 tsp sugar
  • 1 tsp vanilla extract
  • 1/2 tsp nutmeg
  • 1/2 tsp cinnamon
  • 1/2 tsp salt
  • One loaf Challah bread, sliced
  • Maple Syrup, for serving

Directions:

img_1009

Dip each slice of Challah bread into mixture, placing back into a “loaf” (see picture) in  a 9×13″ glass baking dish. Pour remaining mixture between each slice of bread. I used a baster to thoroughly get between each slice.

img_1011

Cover with plastic wrap and place in refrigerator overnight (or at a minimum 2.5 hours).

img_1013

In the a.m.- preheat oven to 375˚. Uncover toast, sprinkle remaining 2 tsp sugar overtop, and cover with aluminum foil. Bake covered for 25 minutes. Uncover and bake for an additional 30 minutes, or until top is golden brown and slightly crunchy, and inside of bread is fluffy (not saturated/moist).

img_1020-copyimg_1022img_1023

Serve with syrup and enjoy!

cook

Fall Pumpkin Roll

Thanksgiving is one the best days of the year for us- we eat foods we wouldn’t normally take the time to make or enjoy, we spend time with family and friends we don’t always see, we truly take the time to acknowledge all the things we are thankful for, and when it’s all done- we sit down to relax and enjoy some football (tonight is a real treat- Bears at Green Bay!!).

This year I was extra spoiled…my family and I went and spent some time with my mom at her cabin and she cooked- everything. Well, almost everything. I have said it before, and I will say it again- my husband is undoubtedly the better baker of us two. Thanksgiving time is no different. Pumpkin Pie is his speciality, and one of his absolute favorite (non-chocolate) desserts. This year, he decided to try a slightly different take on the traditional, and went with a Pumpkin Roll. The end result?? Amazing!

This Pumpkin Roll is both easy and an absolute must try for your fall season festivities. I hope you enjoy this recipe and I wish you a Happy Thanksgiving from my family to yours!!

IMG_0803Roll:

  • 3/4 c flour
  • 1/2 tsp baking powder
  • 1/2 tsp baking soda
  • 1/2 tsp ground cinnamon
  • 1/2 tsp ground cloves
  • 1/4 tsp salt
  • 3 large eggs (beaten)
  • 1 c granulated sugar
  • 2/3 c pumpkin pie filling (canned)
  • 1/4 tsp (approx.) nutmeg

IMG_0804Filling (All mixed together until soft):

  • 8 oz cream cheese (room temperature)
  • 1 c sifted powdered sugar
  • 6 TBSP softened butter
  • 1 tsp vanilla extract

Instructions:

Preheat oven to 375˚ and grease/flour a baking sheet. Combine flour, baking soda, baking powder, salt, cinnamon and cloves in small bowl. Combine beaten eggs and granulated sugar in larger bowl. Add pumpkin and stir in flour mixture. Spread evenly onto baking sheet. Sprinkle nutmeg evenly over the top of cake. Bake for 12 minutes (or until the cake springs back).

IMG_0805
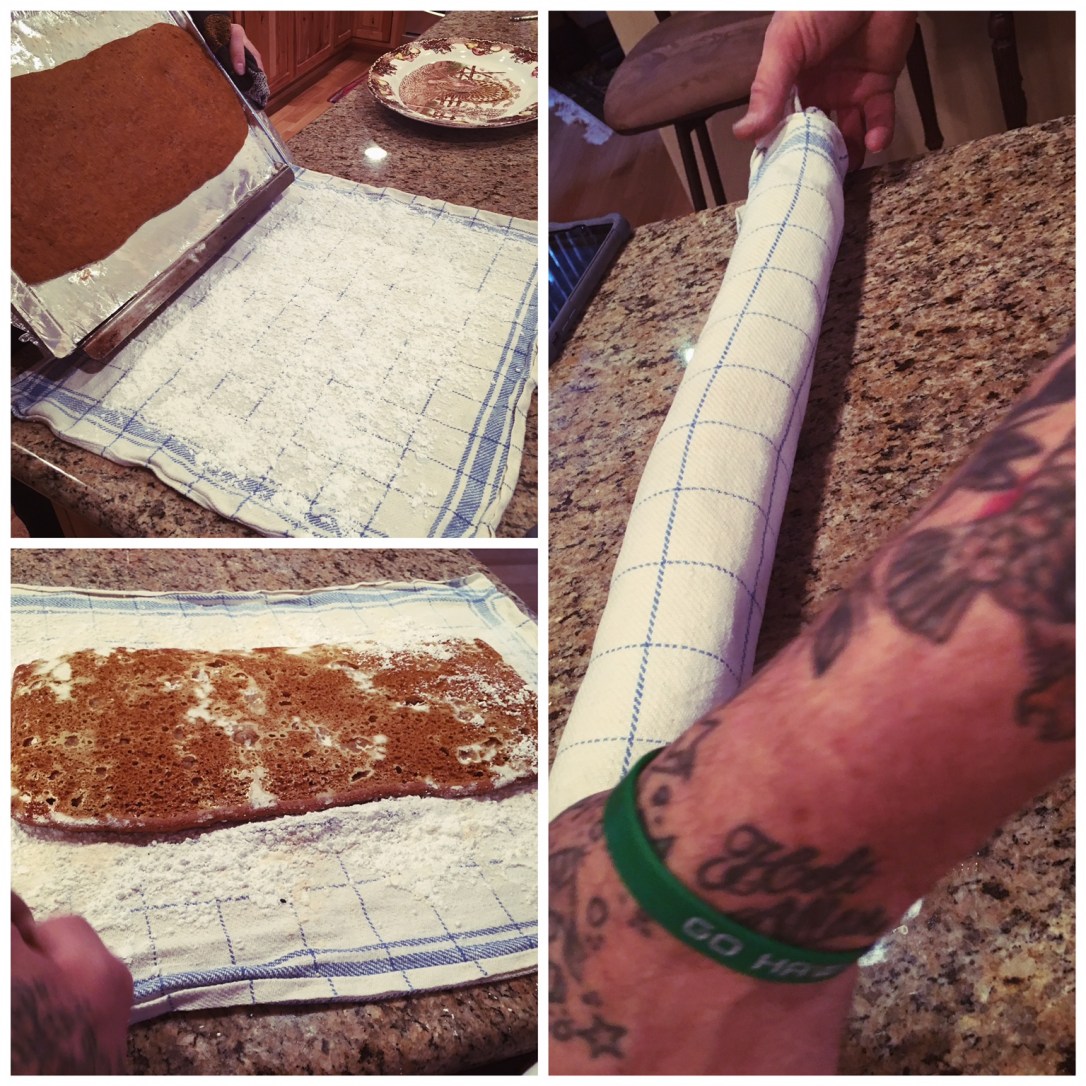
Sprinkle 1/4c powdered sugar onto a clean towel. Turn cake over onto sugared towel and roll vertically (so that the cake is long and narrow). Allow to cool.

IMG_0806
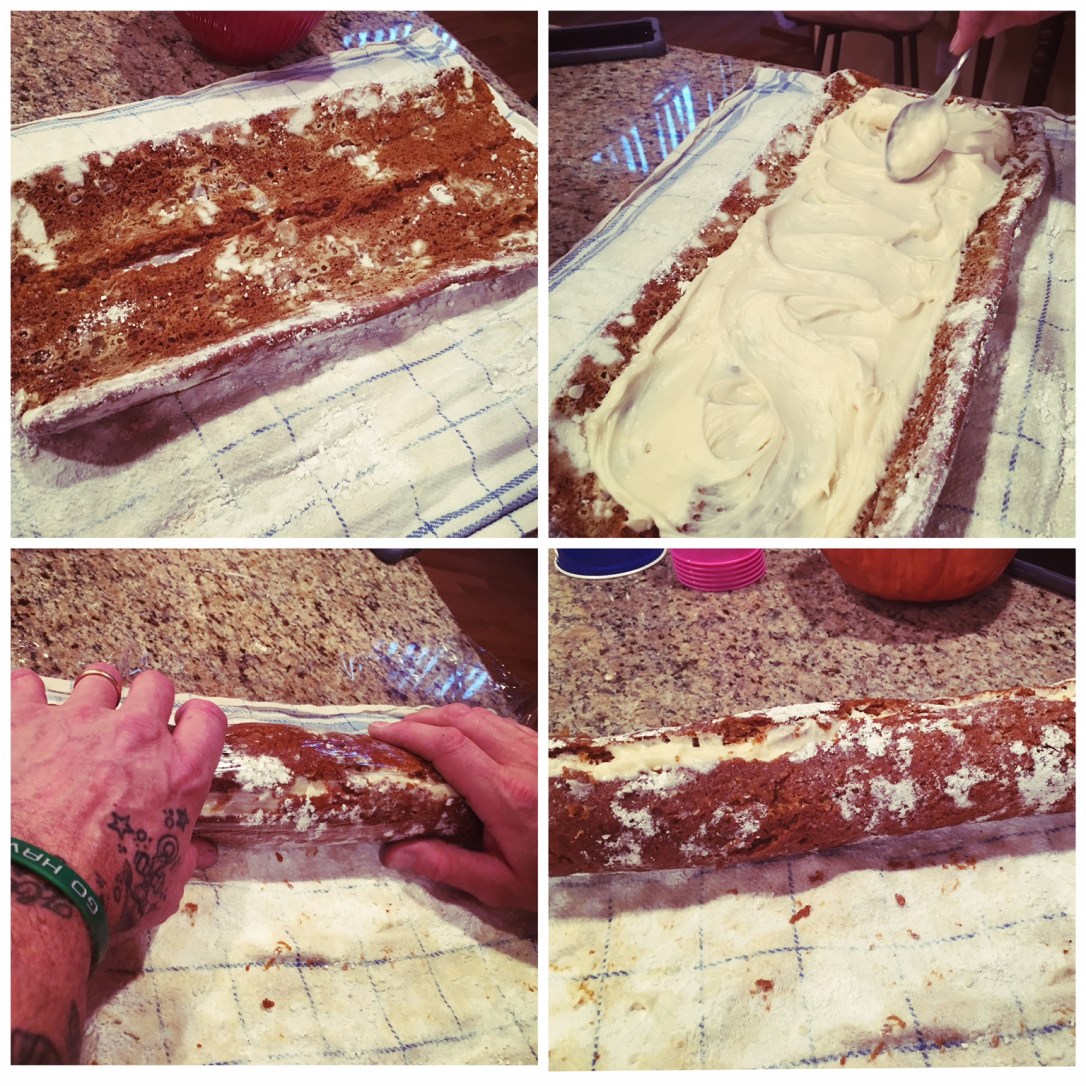
Once cooled, unroll cake and spread filling evenly over cake. Roll the cake back up with filling inside, wrap in plastic wrap, and refrigerate for 1-2 hours. Dust with powdered sugar before serving.

image

Each roll will serve approximately 12, with about 310 calories per serving.